

How to Set Up Domain Redirects (301, 302) Using cPanel
Setting up domain redirects is a common task for managing your website effectively—whether you're pointing an old URL to a new one or reorganizing content. At Vivint Host, we’ve made it simple and secure to create both permanent (301) and temporary (302) redirects using your cPanel dashboard.
Below is a detailed guide to walk you through the entire process:
Step 1: Access Your cPanel
Start by logging in to your Vivint Host cPanel account.
Step 2: Locate the Redirects Option
Once inside cPanel:
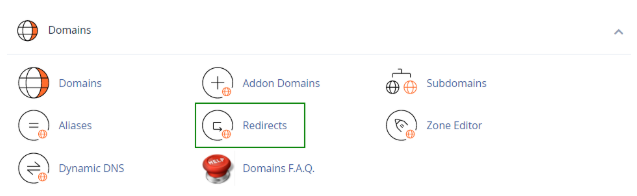
- Scroll down to the Domains section.
- Click on the Redirects icon.
This is where you’ll manage and create redirect rules for your domains.
Step 3: Choose Redirect Type
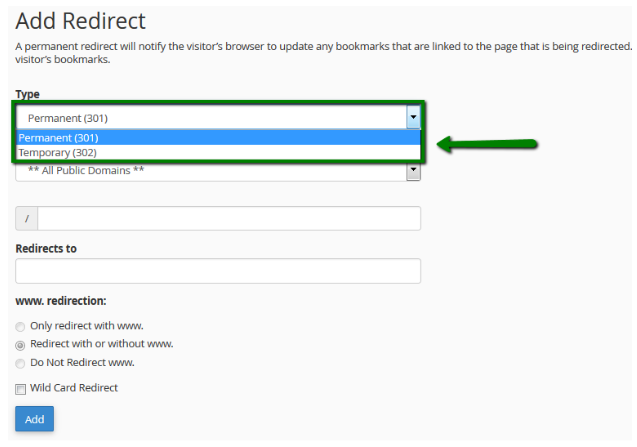
You’ll be prompted to select the kind of redirect:
- Permanent (301): This is the recommended option for SEO. It tells browsers and search engines that a page has permanently moved, prompting them to update their records.
Temporary (302): Use this if the change is short-term. It doesn't pass SEO value and won't update saved bookmarks or indexed pages.
Pro Tip:
Go with 301 redirects if you’re restructuring URLs, moving to a new domain, or eliminating outdated pages. It helps maintain SEO performance and keeps your traffic intact. Use 302 only for temporary campaigns or testing.
Step 4: Select the Domain to Redirect
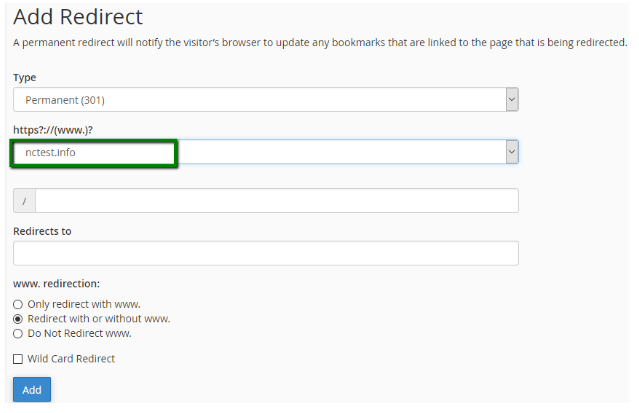
In the drop-down menu, pick the domain you'd like to redirect.
If you're redirecting a specific page or folder (rather than the whole domain), enter its path in the adjacent text field.
Example:
To redirect only yourdomain.com/blog, type blog in the field.
Step 5: Enter the Destination URL
Now, specify where you want your visitors to land.
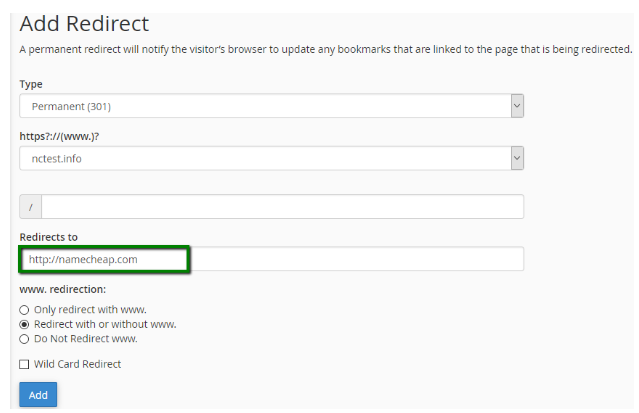
- In the “Redirects to” field, type the full destination URL, including the protocol (http:// or https://).
Example:
- https://newdomain.com
- http://yourdomain.com/updated-page
⚠️ Important:
Always include the http:// or https:// prefix for the redirect to function properly.
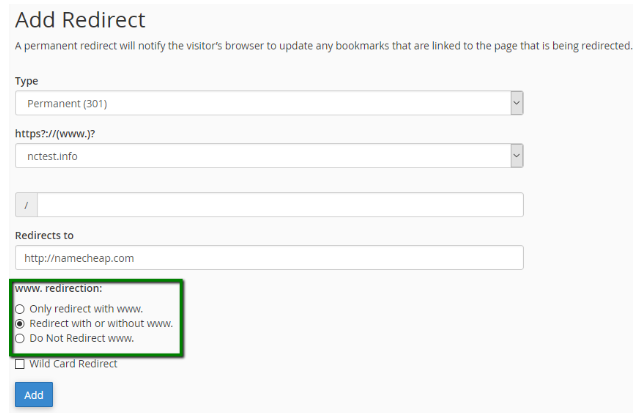
Step 6: Configure the 'www' Redirection Settings
Choose how the redirect should behave with or without www:
- Only redirect with www.: Works only if the visitor uses www.yourdomain.com.
- Redirect with or without www.: Works for both yourdomain.com and www.yourdomain.com.
Do Not Redirect www.: The redirect won’t apply when visitors use www.
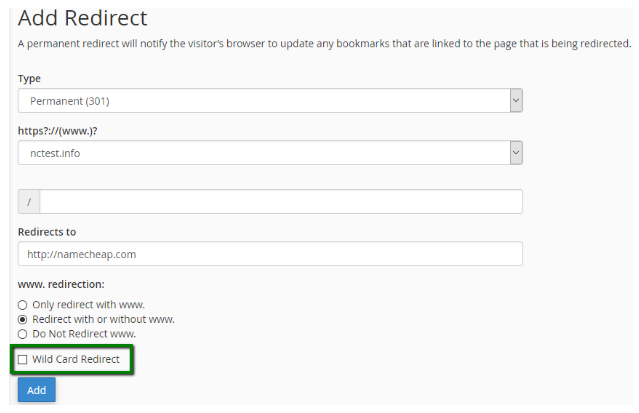
Step 7: Enable Wild Card Redirect (Optional)
Check the box labeled Wild Card Redirect if you want to redirect all files and directories from the current domain to the same structure on the new domain.
Example:
- Source: example.com/docs/manual.pdf
- Target (with Wild Card Redirect): newdomain.com/docs/manual.pdf
- Target (without Wild Card): newdomain.com
Use this option if your directory structure stays the same across domains.
Step 8: Finalize and Apply the Redirect
Click the Add button to save and activate your redirect rule.
You're all set!
Wrap-Up from the Vivint Host Team
Setting up redirects the right way keeps your SEO intact and ensures a seamless experience for your visitors. Whether you're updating old links or migrating to a new domain, following this step-by-step guide ensures that every redirect works exactly as intended.
If you ever need assistance, our Vivint Host Support Team is available 24/7 to help you manage your hosting environment with confidence.