
How To Test Or Preview Your Website Before Switching DNS
One of the most frequently asked questions we receive at Vivint Host is: How do I check my website before I switch name servers?
Since Vivint Host offers free website migrations, many clients prefer to verify their site is functioning perfectly before updating DNS records to avoid any disruptions.
To make this easier for you, we’ve built a simple tool within your cPanel account to help you preview your site before going live.
Preview Your Website Using cPanel
- Log into your cPanel account.
Under the Domains section, click Website Preview.

- Next to your domain name, click Create to generate your preview link.
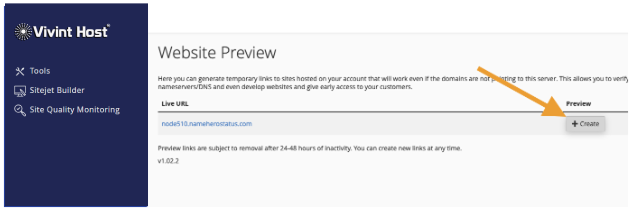
- Click Open. A new browser tab will launch.
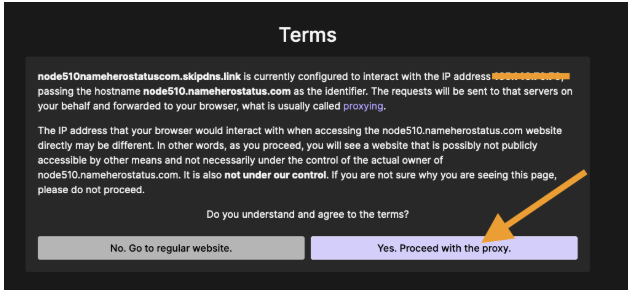
- Review and accept the proxy terms to proceed.
Congratulations - you can now preview your website without updating your DNS.
Preview Your Website by Editing Your Local Host File
If you prefer to use your own computer to preview the site (bypassing DNS), you can do this by editing your hosts file. Here’s how:
For Mac Users
- Get Your New IP Address: You’ll find this in your Vivint Host Client Area or in your welcome email.
- Open Terminal: Go to Applications > Utilities > Terminal
- Backup Your Current Hosts File (recommended): sudo cp /private/etc/hosts /private/etc/hosts-orig
- Edit the Hosts File: sudo nano /private/etc/hosts
- Enter Your Mac Admin Password when prompted.
- Add the Following Entries Below the Existing Text:
|
127.0.0.1 localhost 255.255.255.255 broadcasthost ::1 localhost 64.91.237.213 yourdomain.com 64.91.237.213 www.yourdomain.com |
- Press Control + X, then Y, and hit Return to save changes.
- Flush DNS Cache:
|
dscacheutil -flushcache |
- Restart Your Browsers and visit your domain to view it on the new server. (Tip: Upload a unique file to the new server to confirm you're viewing the right version.)
For Windows Users
- Locate the Hosts File: Path: C:\Windows\System32\drivers\etc
- Open It With Administrator Privileges: Search for Notepad, right-click, and select Run as administrator.
- Open the Hosts File from Notepad.
- Backup the File if you wish, by copying it elsewhere first.
- Add Your Domain and Server IP Like This:
|
127.0.0.1 localhost 64.91.237.213 yourdomain.com 64.91.237.213 www.yourdomain.com |
- Save the File.
- Flush DNS Cache: Open Command Prompt as Administrator and Type: ipconfig /flushdns
Restart Browsers and access your domain.
Important Notes:
You can also use the basic cPanel preview link: http://your-server-ip/~username - but if your site has hardcoded URLs (like WordPress often does), images and links might not display correctly.
Previewing via the hosts file method gives the most accurate test since it replicates what users will see after your DNS is live.
Have questions or need assistance? Vivint Host's 24/7 support team is always ready to help you ensure a smooth, zero-downtime transition to your new hosting environment.